
Git Hub Instruction Site
Advanced Learning with Bash.
Unfortunately, this will be the last page dedicated to learning the Bash Client. To recap, so far we learned how to edit, add, commit, and push a file that was already made. These are the basic steps you will use every time you want to change the repo, and if all of these steps are not done, then nothing will change on GitHub website. Now, to sharpen our skills and finish the tutorial, we are going to make a NEW file, and do it again. If you need to recap what we have done you can always go back and review. Click Here to Go Back!

Step 1.) Creating a New File
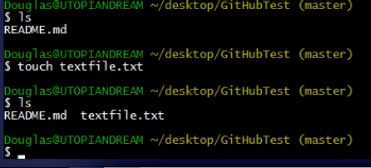
-Open up the Bash client back up and make sure your in your repository folder with the README.md. Then type the command:
1.]$ touch textfile.txt
(This creates an empty file of the name “textfile” and of the type .txt, in your current folder.) Again, to reemphasize the steps, this does NOT change your repository online until we add, commit, and push.
-As before with the README, Let’s open up that text file and write something. You can write anything you like. Ex: “This is my first file I created for GitHub through Bash!”
2.]$ vi textfile.txt
-After you write something, “:wq” to exit and save.
To check where the text file is in the total process, let’s use the command $git status. As you can see, our txt file is in the red status, meaning that it is not in the staging process to be uploaded on the site, and is not being “tracked”.

Step 2.)Adding, Committing, and Pushing.
3.]$ git add . <---notice the period!!!
(This command adds all the untracked files you may have created or edited.)
Now since we added the file, the next step is to commit.
4.]$ git commit –m “This test file has been added and is Awesome.”
(Again, the –m adds an optional message to the file, so others can read when it is uploaded.)
-Now that the file has been added and committed, it is always a good idea to check with $ git log, and then another $ git status. (You should start to see a rhythm being used.)
Our newly made file is added and committed, so what now? You guessed it. We have to push our new file to the repository online. Use the command:
5.]$ git push
(Since we used –u and set up remote origin, we do not have to do it again, and can now type the simple command $ git push until we use a different repository.) Type in your username and password as done before with the README file.


Step 3.) Learning the Pull command.
Great Job!
Your new file is now on the GitHub website, and can be viewed by you and others. Let’s check this and see our brilliance.
-Go to the GitHub Website, and then at the bottom right of the home page click on your repository. You should then see your two files that are in your repository, and the optional messages you added when you committed them.
-Click the textfile, and you’ll see that you can view what’s inside the file.
Using the Pull Command
Now you must be wondering, well if I added this to the repository, how do others get my file? How do I receive the files others might have uploaded? Which brings up to the main point of GitHub which is working together to make better code.
We will use the pull command to pull the new files from the website repository, and add them to your local folder on your desktop(or wherever your repository folder may be) so that you can view and edit them if need be.
-Just to use the command for the sake of learning, open up your bash client, and type the command:
6.]$ git pull origin master
It should say the file is up-to-date, because we have all the updated files from the repo already.

CONGRATS! You Have now finished the GITBASH tutorial!
You have now created a new file within bash, and then you were able to edit, add, commit, and push that file into the repo on the GitHub Website. I hope you enjoyed your learning session, and I hope you now have a basic feel for how to use the GitBash Program. Of course there is much more to learn, and you can always check out the GitHub Site to learn more!