
Git Hub Instruction Site
Learning the Bash.
In this section, we are picking up directly after the Setting up Git Bash page. We will be learning the basic commands of Git Bash after successfully creating a repository, and cloning it to your Git Bash Client. We left off within our repository folder which was located on our desktop, with only a README.md file inside. This can get a little tricky, so the numbered commands are pointed out. (Hopefully to prevent typing errors.)
1
2


Step 1.) Editing an already made File.
Type in the command:
1.]$ ls
-And then Enter, to check the contents of your folder. There should be a README.md text file. We are now going to now attempt to open and edit that README file.
Note- We doing the same thing as opening the GitHub Test folder from your desktop, Right clicking the README file, and opening it up with notepad. The only difference is that we are using text based commands within Bash client to do it. (You’re probably starting to feel like a Genius, and this is normal.)
Now to edit a file, type the command:
2.]$ vi README.md <---Name of file you want to Edit
Note- vi or vim are text based editors for coding, and can also be replaced by nano, or any other. Based on personal experience and simplicity, we will be using vi. If you are learning to use GitHub, you should be familiar enough to know how to type within vi, and save and exit your work.
[Crash course Basics On VI: There are 2 modes: Command and Insert. Pressing “ i ” will allow you type within file, also known as insert mode. Press “Esc” to get out of insert mode, and back to command mode. Arrows are used to navigate the cursor(Only used in command mode). And to quit, Type “:wq” and then ENTER to exit and save your work(Also only used in command mode). To exit without saving Type ":q!"]
-Use the arrows to go to end of file.
-Press “ i ” to enter insert mode, and then enter to go to next line. Type in something that will help describe what this project is. Ex: “This is showing how to open and edit a Readme file...” Or whatever your inner nerd heart desires. <3
-Now Press Esc to go back to command mode, “:wq” ENTER to exit and save your work.
3
4
5


6

Step 2.) Adding and Committing Edited File.
-While out of vi, and back to Bash Command line, type in the command:
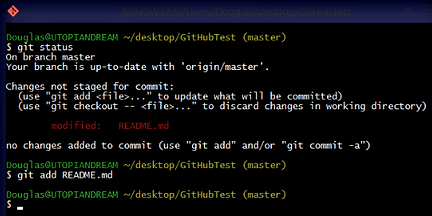
3.]$ git status
(This tells us what files are modified, and what files are not modified.)
-Now, we want to update the changes we made, and post them online. To start this process we have to add the files to a staging area which will later be committed and pushed onto the GitHub Website. Use the command:
4.]$ git add README.md <--put designated FileName.
(This command adds your modified files to a staging area, before they are committed and pushed online.)
-Use the command $ git status, and you will see that modified: is now green. This lets you know the modified files are added to the staging area and are ready to be committed. (Also contains instructions for how to un-stage that file, or undo the add command.)
-Now that the file is ready to be updated, we are going to “commit to” this change and use the command:
5.]$ git commit –m “Optional Message you want to others to see about your update”
Ex: “I added more information to the readme file”
!QuickTip! To see more “–“options you can use with the git commit, use the command $ git commit –help
-Type in the command:
6.]$ git log
(This shows us a full description of the changes, the Usernames of who changed files, and the dates on which the files were modified.)
-Use the $ git status command one more time to see a new notification. This says that the branch you are working on, no longer the trunk since we made changes, is ahead of the old repository, the trunk/master, by however many commits we have made.
!QuickTip! If for some reason, you do not have a place to push your changes to, aka a repo is not connected to website, you can use the command $ git remote add origin https://URL of repo you are pushing to.
Since we cloned our repo, this is done for us.
7
Step 3.) Pushing/Uploading Files to GitHub
-Now to Finalize our change to the GitHub Website, we are going to push our commit to the website with the command:
7.]$ git push –u origin master
What did you just do?.. Let me break down the command. Of course the $ git push is the command to push your commits to the site. “ –u ” is for saving and setting up an upstream for git pull/status. If there were a lot of commits, we could use the option " –a " for all. The “origin” is the for the current remote location, “master” is what branch you are pushing to. If you don’t understand right now, that is okay, just knowing the basics of how to upload commits is what matters at the moment.
-Next, you have to type in your username for GitHub, hit enter when finished.
-Now, you will be prompted for your password, type that in and hit enter.
(The information underneath is details about the push, and whether or not it was successful.)
CONGRATULATIONS!
You have now successfully made a Repo, Cloned that repo to your newly installed Bash client, Made changes to files within that repo, And then uploaded those changes back to the GitHub website for everyone to see!!!! You my friend, must be a genius.... And geniuses know they always have to finish the lesson, so click the link to finish up!
